As you start the ePortfolio that you will build throughout your time at UNE, you will not only begin shaping a professional digital identity, but you will also be constructing a website. For most students, web-building is a new skill set with an unfamiliar interface, so it may take some time to feel familiar. At the beginning, your site’s purpose may be shaped by course requirements, but you should also select and add experiences and reflections to demonstrate your learning and growth. This is your space on the web to create a professional, digital representation of your growth, accomplishments, and goals.
Your UNE ePortfolio site is part of the UNE ePortfolio network and will be built using WordPress software. Like Wix or Weebly software, WordPress allows users to add multimedia content and customize their sites. WordPress software is used to build 1/3 of ALL sites on the Internet, so you are likely to encounter sites built in WordPress for many different uses. Many people write blogs using WordPress, but organizations and corporations also use WordPress. For example, UNE’s library services site is built with WordPress as are many company sites and blogs.
Launch Sequence
After completing the launch sequence, users should:
- Understand the purpose, terms, and expected usage of an ePortfolio site
- Be familiar with the WordPress dashboard
- Begin personalizing the site by adjusting site settings, deleting sample content, adding an About page, and customizing the site.
After you have launched your site, you may make adjustments to any of the above at any time. The basic launch sequence is outlined in the steps below and should take about a 45 minutes to complete. You do not have to complete it all at once. You may also choose to customize your site in small ways, such as adding a tagline or changing font color, or in greater ways, such as changing the theme, adding categories to keep your content organized, adding featured content, or building out a menu.
ePortfolio Setup Checklist
The list of tasks to get your site set up is outlined below. Each task has other resources available to provide more in-depth instructions. It may be easiest for you to open two browser windows to put side by side as you move through the set up process. Steps 1-4 will take 10-15 minutes. Invest about 30-45 minutes in learning the basics in WordPress and in getting your site set up. You may make changes at any time.
- Watch the introduction to ePortfolio video and 2022 Grad video (below) to understand the purpose and value of building your ePortfolio.
- Log on to your ePortfolio site by clicking the “uneportfolio.org” chiclet from the Okta dashboard (click here for more detailed instructions).
- Read the Terms of Use.
- You will use the WordPress Dashboard to add content and customize your site. View this written overview (see sections “The Dashboard” and “The Admin Sidebar”) or video tour of the Dashboard (6 minutes) to get familiar with it before you begin building your site.
- Adjust your site settings, and delete sample content. Click here for additional instructions.
- Create an About page and learn the difference between pages and posts. Click here for additional instructions.
- Make a menu and learn about categories. You should also get familiar with the structures of your site, such as posts and pages. Click here for instructions and more information.
- Customize your site to make it your own. Click here to learn about ways to customize your site.
Purpose & Value of ePortfolio (8 minutes)
Settings Tutorials and Resources (5 minutes)
Read the Terms of Use.
Change the time zone to “New York” in Settings > General.

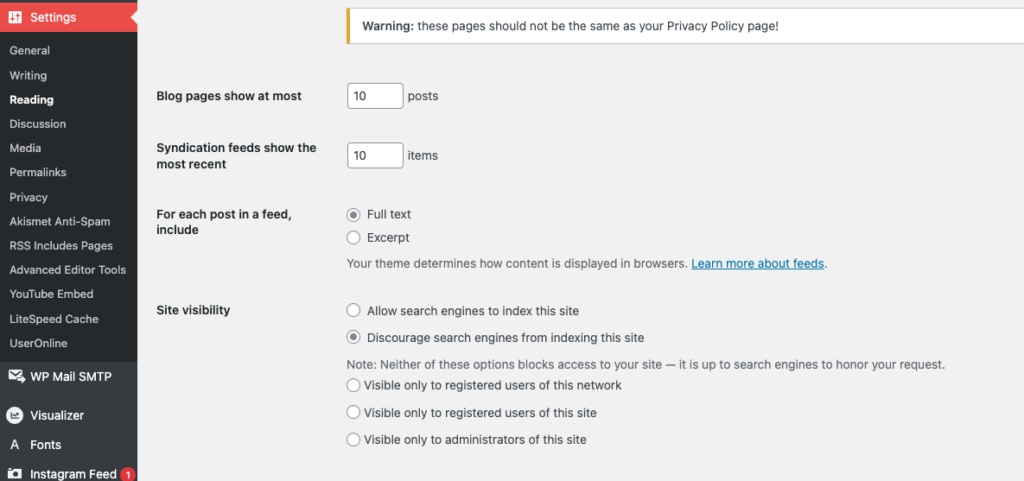
The site visibility setting refers to the entire site. Users may choose to limit the audience of individual posts or pages of the site, but this setting is the default for the whole site.
- Allow search engines to index site: your site is a public site. Anyone with the URL may view the site. Typically ePortfolio sites do not generate enough traffic to be noticed by search engines unless the URL is being shared widely (ex. on a LinkedIn profile or other social). This is the default setting for an ePortfolio site. (Recommended)
- Discourage search engines from indexing this site: your site is a public site. Anyone with the URL may view the site. As noted in the settings, search engines are discouraged (but not required) to honor your request. (Recommended)
- Visible only to registered users of this network: your site is visible to other UNE ePortfolio users. Only those users who are part of the UNE Portfolio Network may view the site. This typically includes classmates and professors, but only those who are registered users of the UNE Portfolio Network. Others will get a login screen. (Recommended)
- Visible only to registered users of this site: your site is visible only to UNE Portfolio Network users whom you have chosen to have access to your site. If you only want your site to be visible to specifc people in the UNE Portfolio Network, you will add them individually. This option is not recommended since you will need to adjust it frequently (at least every semester), including adding specific professors.
- Visible only to administrators of this site: your site is visible only to you and a few UNE IT and SASC administrators. Your site is not visible to professors, classmates, advisors, etc.
The site visibility setting may be changed at any time. Students who choose to share their ePortfolio site with grad schools or potential employers should be sure to set their site visibility to one of the public options.


Content (15 min)
- Publish an About page to your ePortfolio. The video tutorial below, provides technical instruction and ideas for content. For more detail on audience consideration and professionalism, see Constructing your About page.
Add the About page to your menu. To see written instructions with screenshots click here, or watch the following video tutorials for customizing your navigation menu.
Add categories to organize your site. Similar to hashtags, categories connect content on your site. Multiple categories could be added to the same post. Note: categories can only be applied to posts.
Categories can be used to connect:
- course content by course number or learning objective (ex. DEN 100 Posts, peer review)
- types of media (ex. video, audio, podcast, blog)
- skills (ex. collaboration, leadership)
- experiential learning (ex. service learning, global, internships)
- or co-curricular experiences (ex. UNE hockey blog, environmental club).
Customize (10 min)
Add a header photo, change the background, select a new theme: these are all ways to customize your site. Visit Customize to learn more.
Questions or feedback?
Students should visit SASC; faculty should contact CETL.